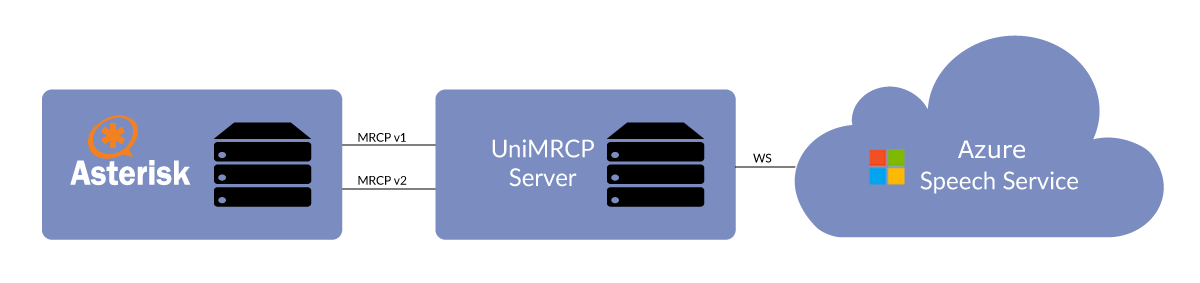
¶ 1 Overview
The goal of this tutorial is to set up a demo environment allowing users to place calls to Asterisk and interact with an Azure bot via Direct Line Speech channel. The tutorial provides complete step-by-step instructions for installation of Asterisk and UniMRCP server with Azure Bot Service (BS) and Speech Synthesis (SS) plugins.
¶ 2 Azure Bot Service
Various Azure resources are required to be used in order to interact with Azure Bot Service via Direct Line Speech channel. It would be advisable to create all the resources in the same Azure region to reduce the latency. The West US 2 region is used in this tutorial.
Instructions provided herein are derived from this article.
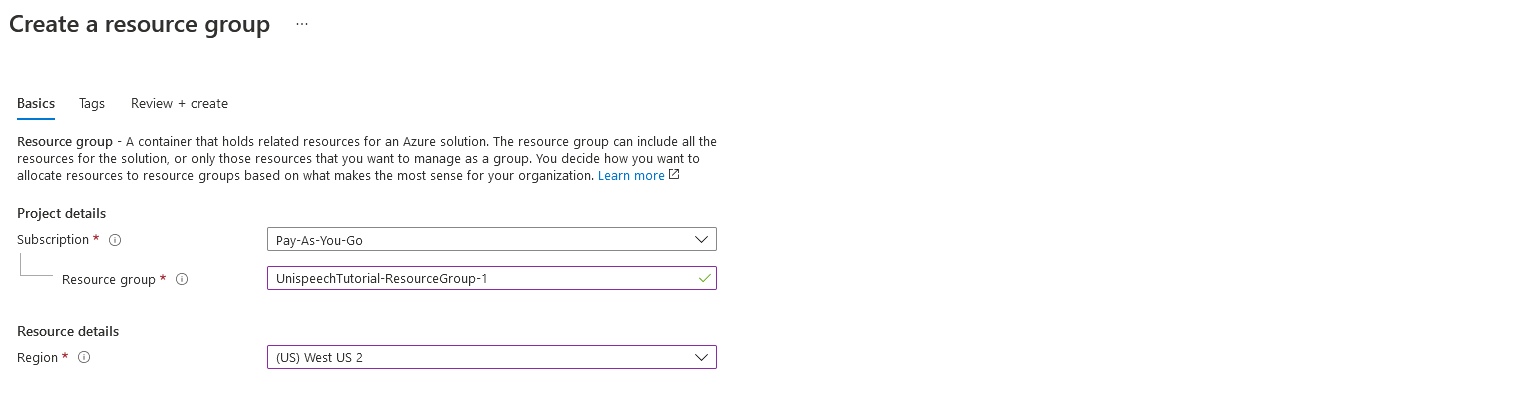
¶ 2.1 Creating Resource Group
- Create a new resource group.
 Azure Portal Create a resource group
-
Fill out the form fields based on your preference.
-
Click Review and create.
-
Click Create.
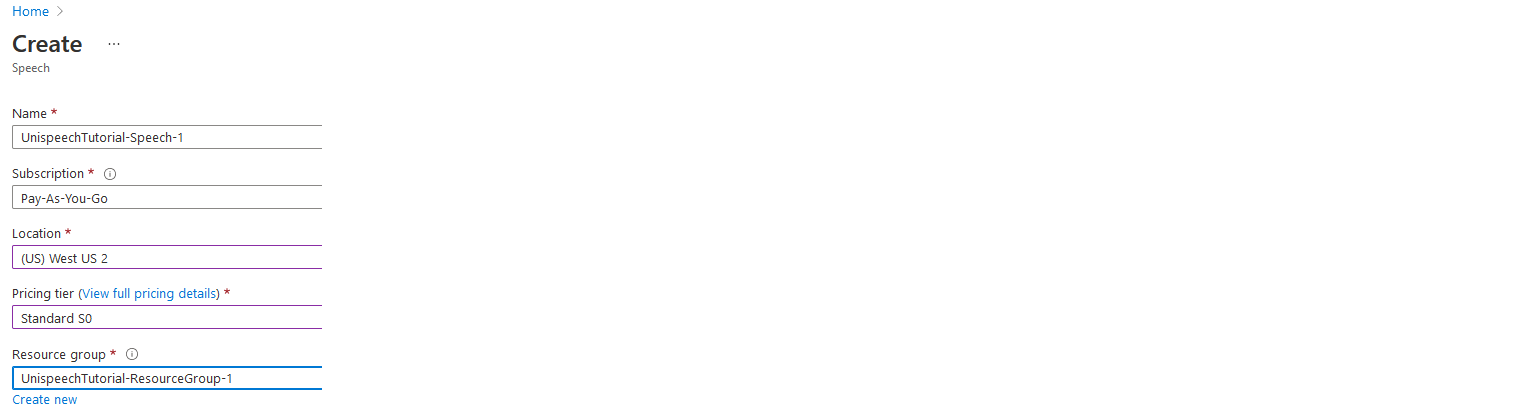
¶ 2.2 Creating Speech Resource
- Create a new speech service resource.
-
Fill out the form fields based on your preference.
-
Click Create and wait for the resource to be deployed.
-
Click Go to the resource and then click Keys and Endpoint.
-
Collect one of the two keys (1) and the region-based authentication endpoint (2).
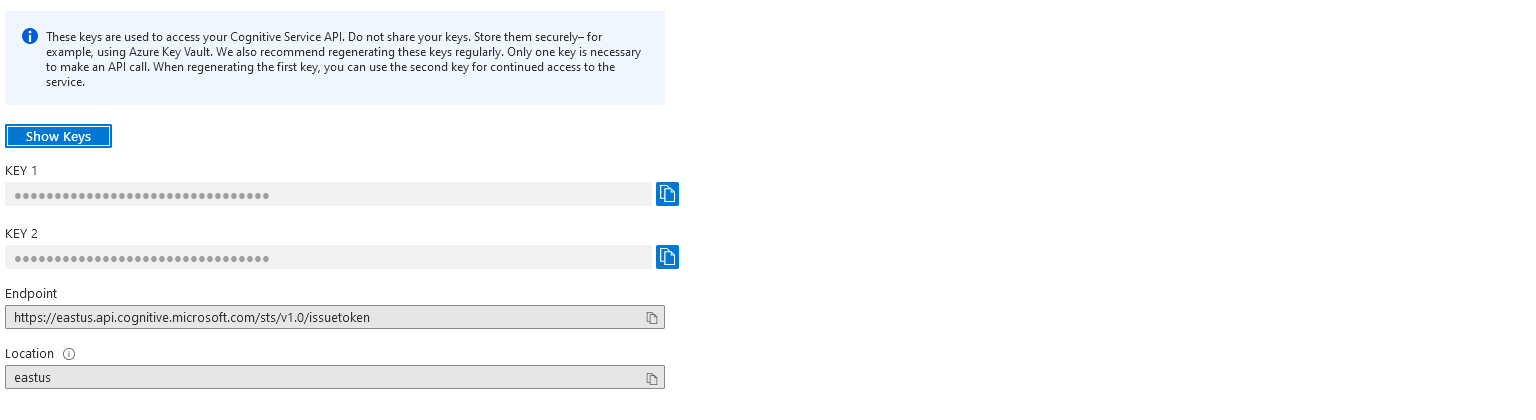
The key and the authentication endpoint will later be deployed to the UniMRCP server to consume the Azure services.
¶ 2.3 Creating App Service Plan
- Create a new app service plan.
-
Fill out the form fields based on your preference.
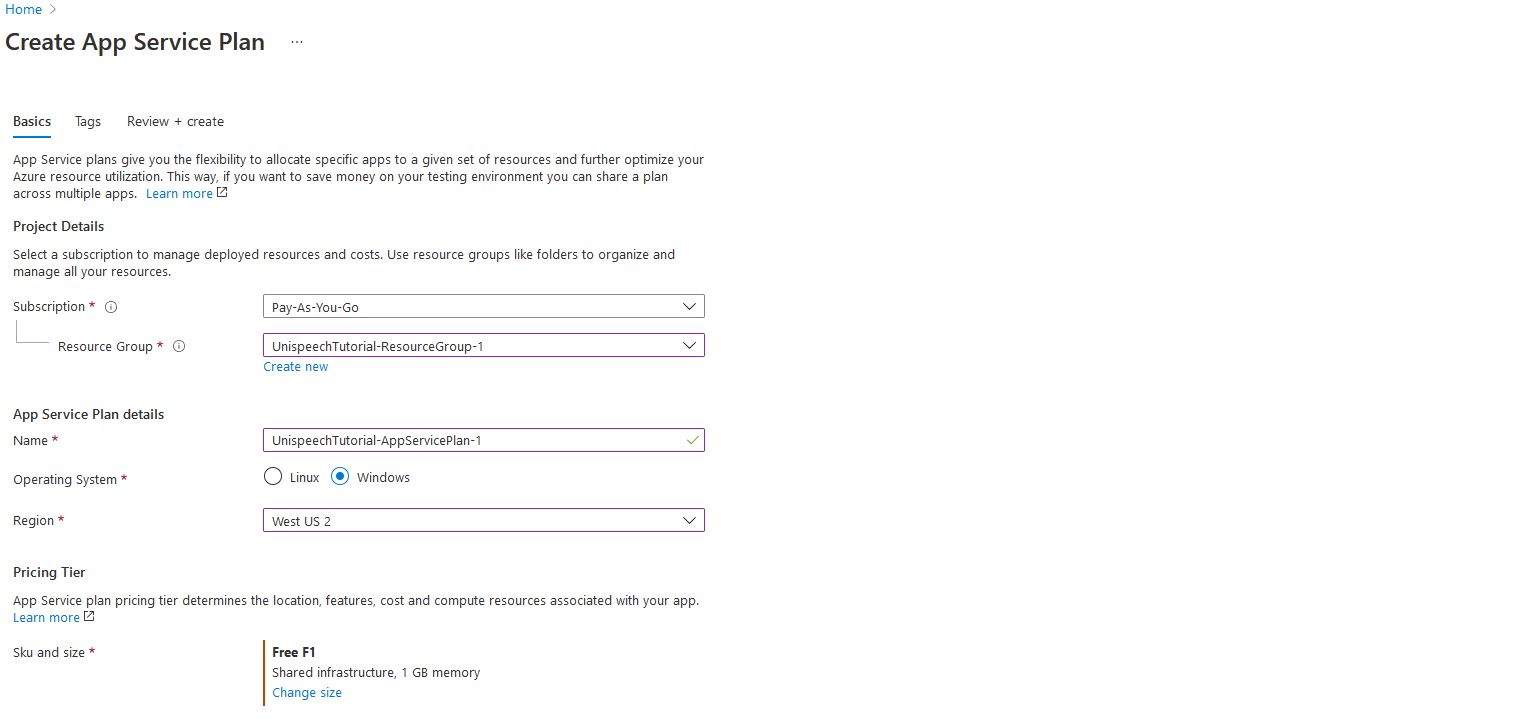
-
Click Review and create.
-
Click Create.
¶ 2.4 Building and Deploying Bot
In this section, a sample echo bot will be built and deployed to an Azure App Service.
- Clone the samples repository from GitHub.
git clone https://github.com/Microsoft/botbuilder-samples.git
- Launch Visual Studio and open the solution file.
samples\csharp_dotnetcore\02.echo-bot\EchoBot.sln
-
Press F5 to build and run the project.
-
In the Solution Explorer, right-click the EchoBot project and select Publish.
-
Select Azure, click Next, select Azure App Service (Windows), click Next, and click Create a new Azure App Service... by the green plus sign.
-
Fill out the form fields based on your preference.

-
Click Create and then Finish.
-
Click Publish on the right side of the Publish screen. Visual Studio deploys the bot to Azure.
At this point, all the created resources should be displayed under the corresponding Resource Group in the Azure portal.

In order to enable communication of the bot with the Direct Line Speech channel using Web sockets, complete the steps below.
- Navigate to the created App Service named EchoBot20210602171700 in our case.
- In the left navigation pane, under Settings, click Configuration.
- Select the General settings tab.
- Locate the toggle for Web sockets and set it to On.
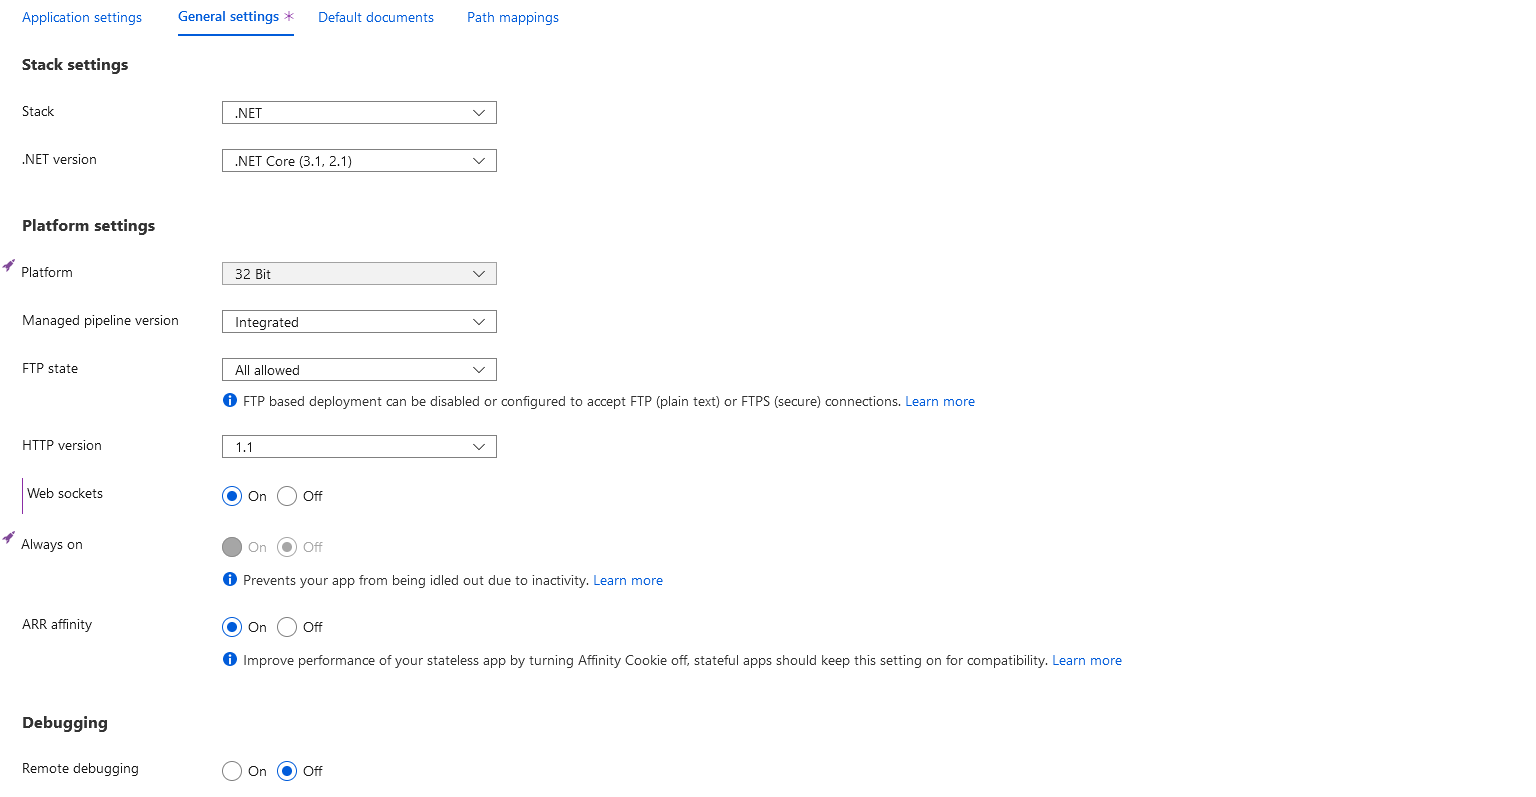
- Click Save and Continue.
¶ 2.5 Creating Channel Registration
- Create a new channel registration, which is a prerequisite for registering the bot with Bot Framework channels, including the Direct Line Speech channel.
- Fill out the form fields based on your preference.
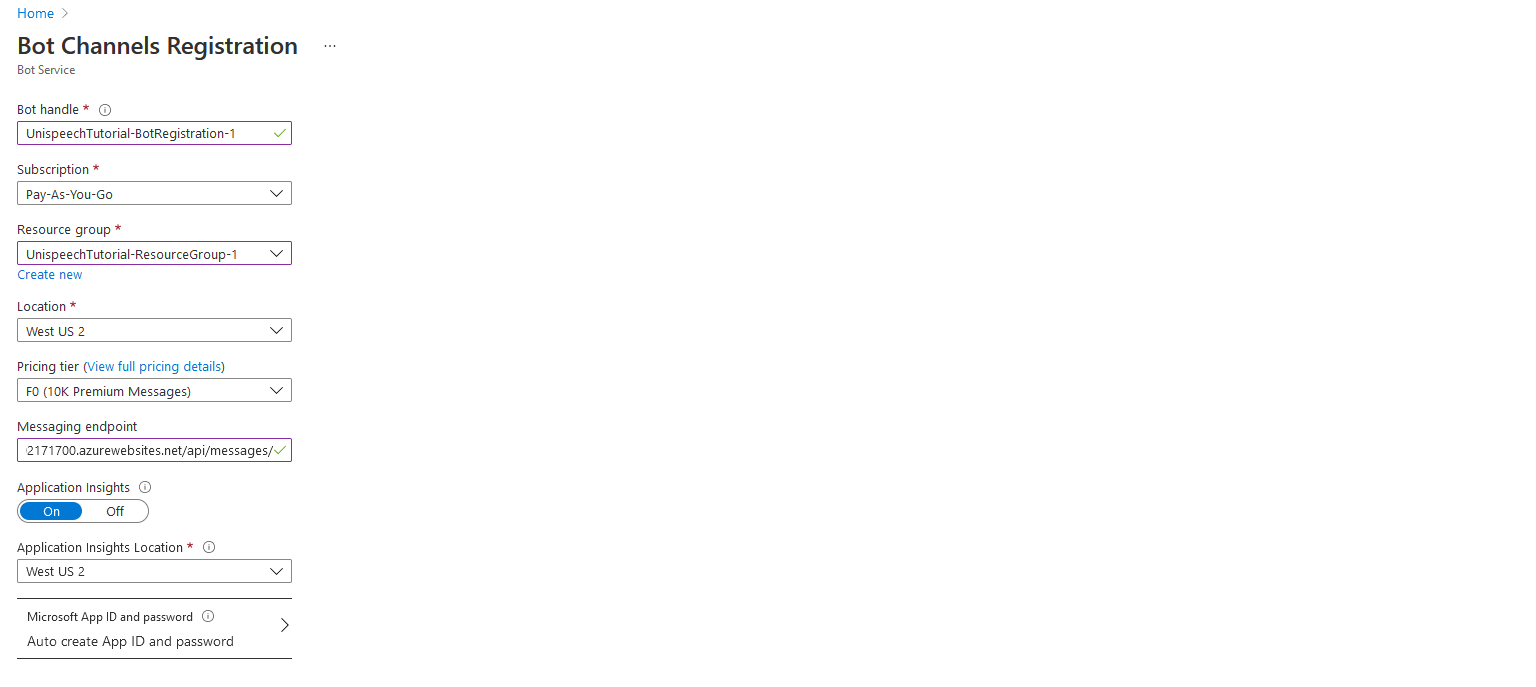
For Messaging endpoint, enter the URL for your web app with the /api/messages path appended at the end.
For example:
https://EchoBot20210602171700.azurewebsites.net/api/messages/
The name EchoBot20210602171700 must be replaced with your unique app name.
-
Click Create.
-
Open the created channel registration.
-
Select Channels on the left sidebar.
-
Under More channels, click Direct Line Speech.
-
From the drop-down menu, select the speech resource created earlier (UnispeechTutorial-Speech-1) to associate the bot to the speech subscription key.
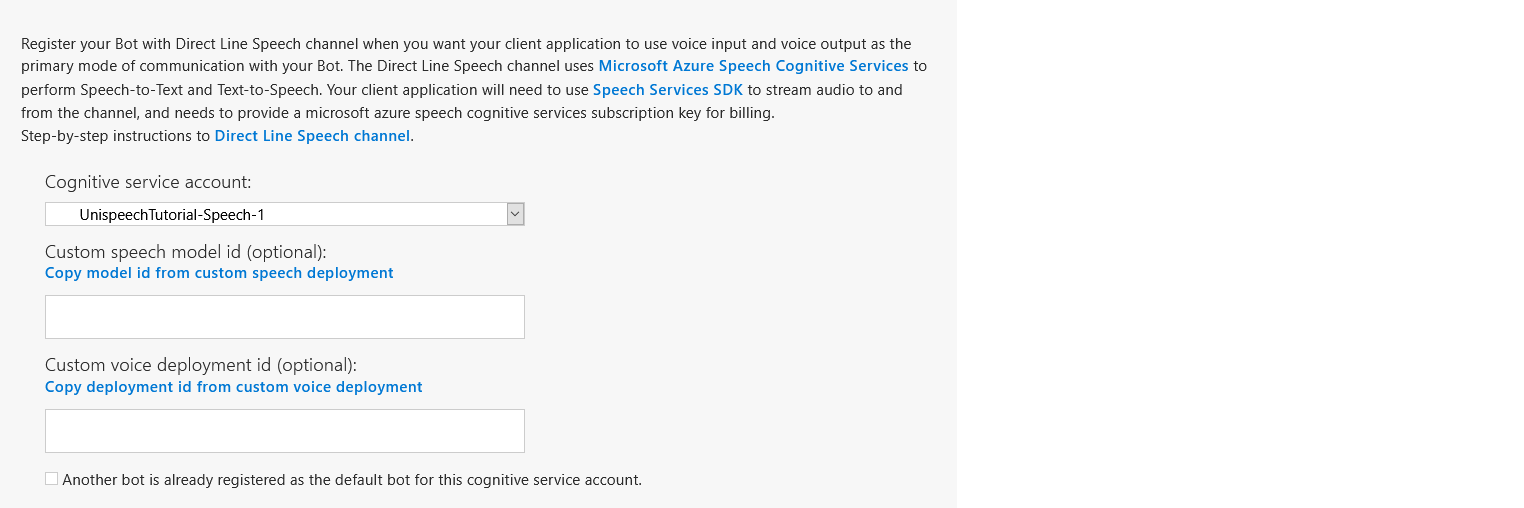
-
Click Save.
-
Select Configuration on the left sidebar.
-
Check Enable streaming endpoint.
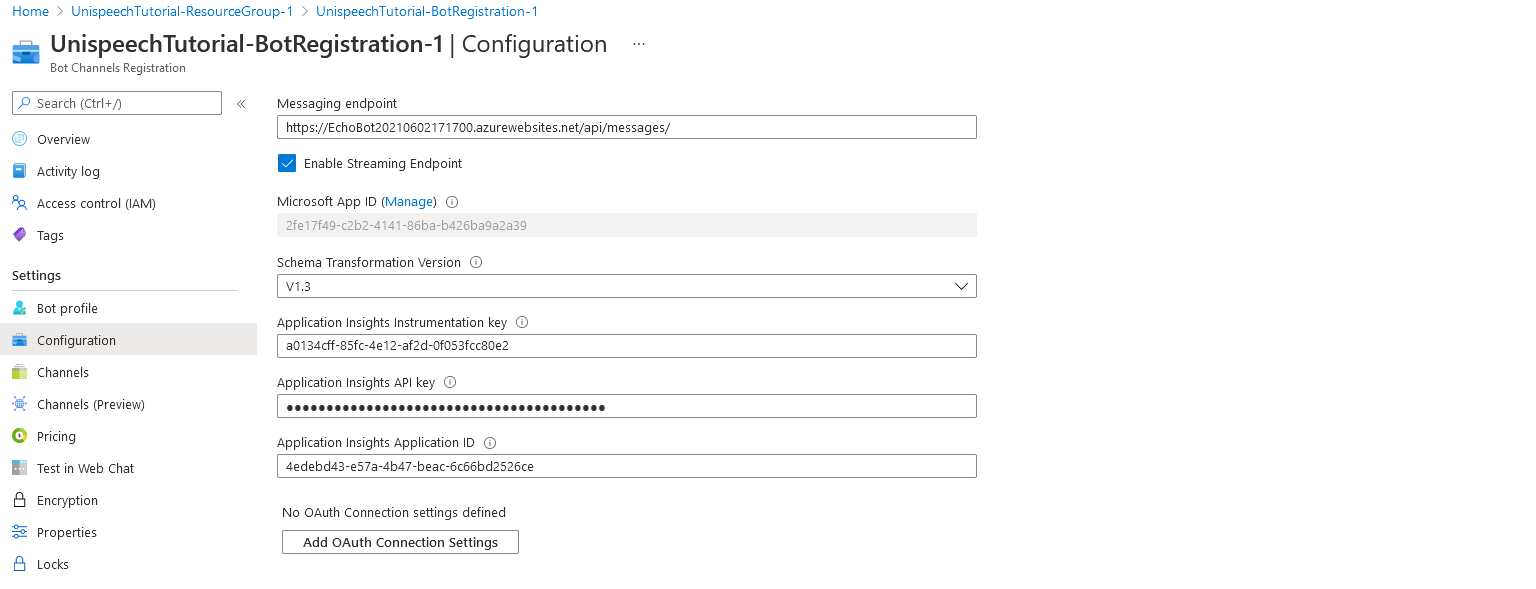
-
Click Apply.
¶ 3 Virtual Machine
In the scope of this tutorial, a virtual machine (VM) will be launched on Azure, which is inline with the use of the Azure Speech APIs. A similar environment can be built on other cloud-based and/or on-prem infrastructures.
Both UniMRCP server and Asterisk are going to be installed on a single VM for simplicity.
While Ubuntu 20.04 LTS is used in this tutorial, the same or similar instructions apply to other Linux distributions supported by UniMRCP.
¶ 3.1 Launching VM
- Log in to the Microsoft Azure portal and click Virtual machines.
-
Click Add and then Virtual machine.
-
Set up the instance parameters accordingly.

-
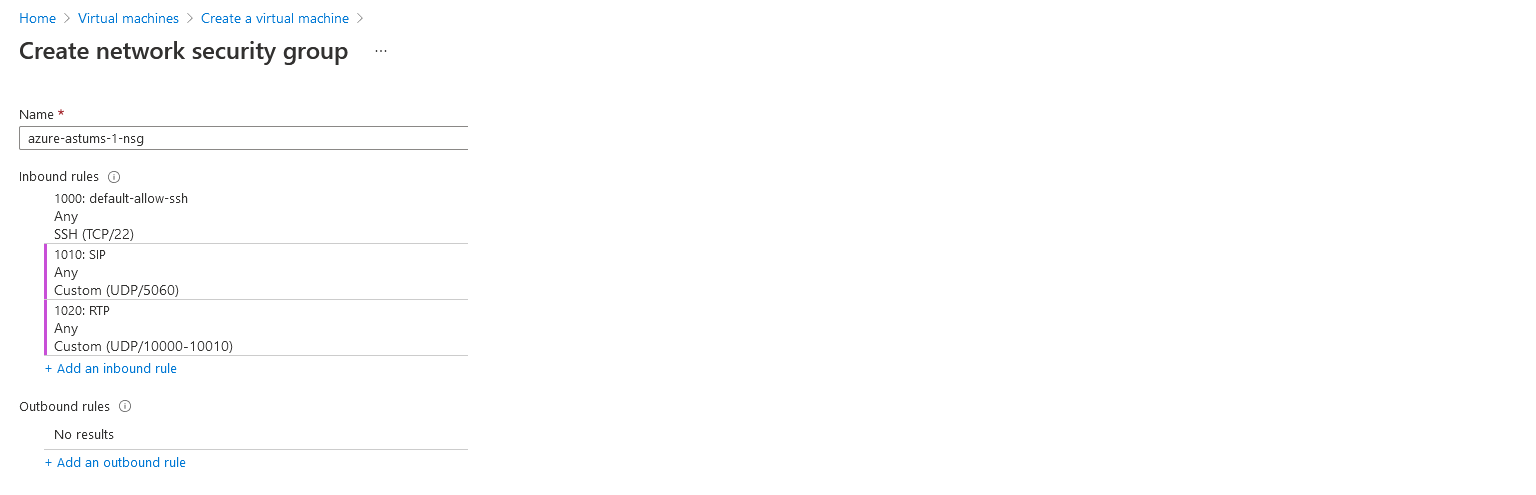
Under the Networking tab, set NIC network security group to Advanced and click Create new
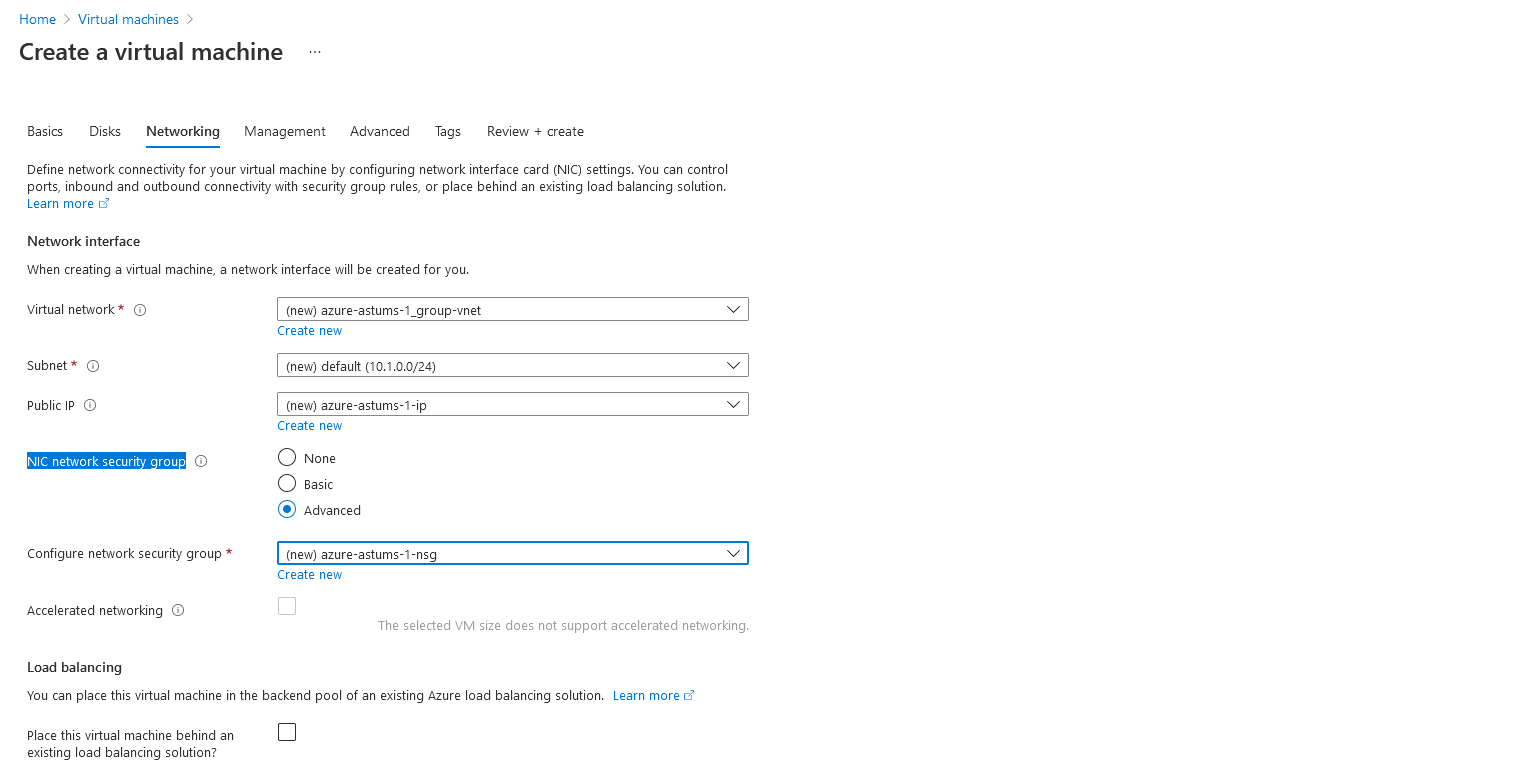
-
Click Add an inbound rule for the SIP port: Custom UDP, 5060.
-
Click Add an inbound rule for the RTP port range: Custom UDP, 10000 - 10010.
-
Click Review and create.
-
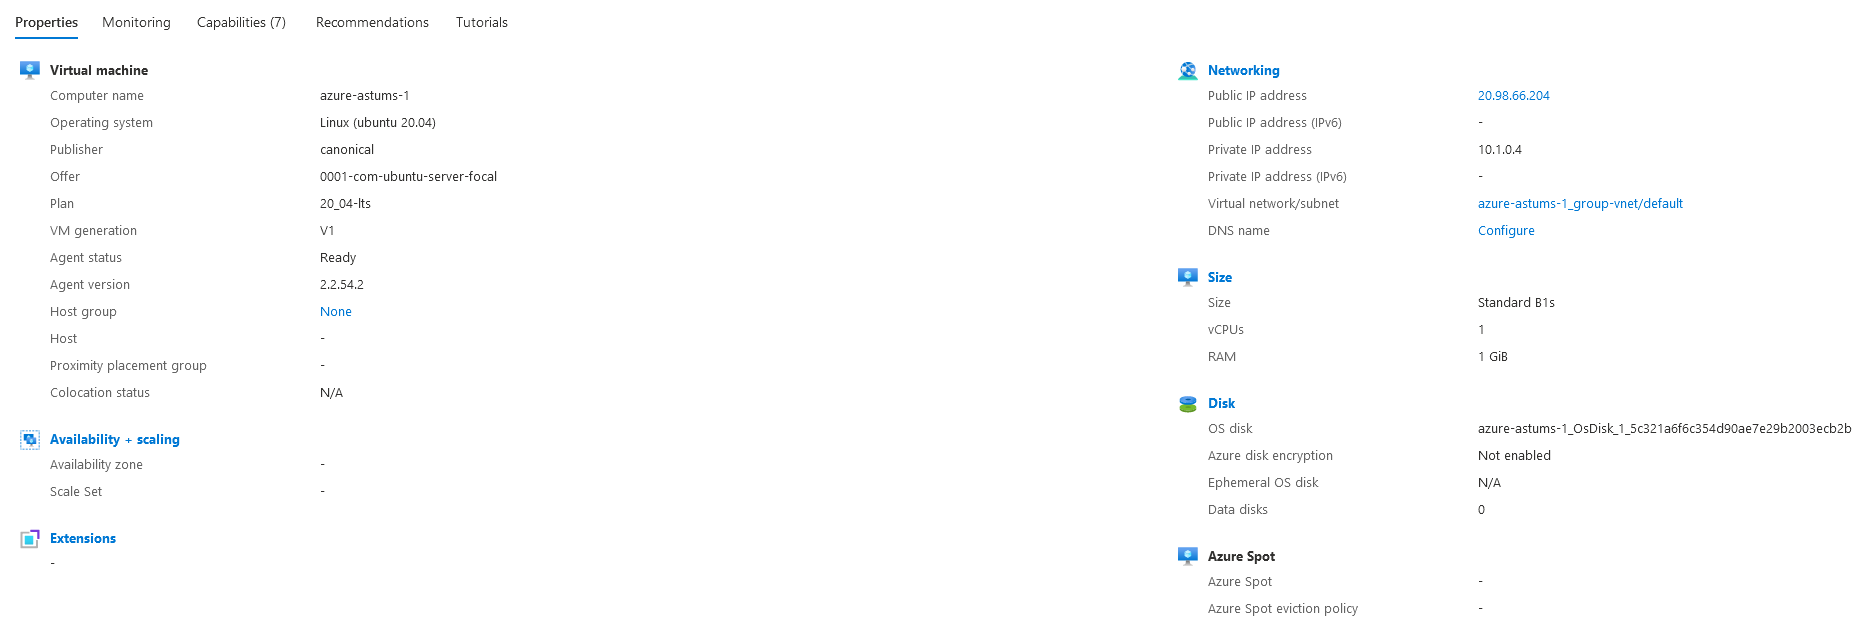
Wait for the instance to be deployed. Navigate to the instance page and take note of the public and private IP addresses, which will be used later in the Asterisk configuration.
-
Connect to the instance via SSH using the associated key and the public IP address. The default username is azureuser.
ssh -i your-private-key azureuser@public-ip-address
¶ 3.2 Configuring APT Repository
- Account
UniMRCP binary packages are available to authenticated users only. In order to register a free account, please visit the following page. Skip this step, if you already have an account.
 Profile Registration Open an account at unispeech.io
A newly registered account needs to be verified by the user and then activated by the administrator prior further proceeding.
Account verification and activation.
- APT Auth
Create a text file unimrcp.conf in the directory /etc/apt/auth.conf.d/.
sudo nano /etc/apt/auth.conf.d/unimrcp.conf
Supply login information in the following format.
machine unimrcp.org
 login     username
 password  password
The username and password fields must be replaced with the corresponding account credentials.
Account credentials.
- APT Repository
Create a text file unimrcp.list in the directory /etc/apt/sources.list.d.
sudo nano /etc/apt/sources.list.d/unimrcp.list
Configure a repository by adding the following entry.
deb [arch=amd64] https://unimrcp.org/repo/apt/ focal main asterisk-16
- GnuPG Key
For verification of binary packages, UniMRCP provides a public GnuPG key, which can be retrieved and installed as follows.
wget -O - https://unimrcp.org/keys/unimrcp-gpg-key.public | sudo apt-key add -
- APT Update
In order to check for updates and apply the changes in the APT configuration, use the following command.
sudo apt-get update
¶ 4 UniMRCP Server
This section provides instructions for installation and configuration of the UniMRCP server with the Azure Bot and SS plugins.
¶ 4.1 Installing UniMRCP Server
In order to install the UniMRCP server with the Azure Bot and SS plugins, including all the dependencies, use the following command.
sudo apt-get install unimrcp-azure-bot unimrcp-azure-ss
As a result, apt-get will check and prompt to download all the required packages by installing them in the directory /opt/unimrcp.
In order to install the additional data files for the sample client application umc, the following command can be used.
sudo apt-get install umc-addons
This package is optional and provides additional data to be used for validation of basic setup.
¶ 4.2 Obtaining Licenses
The Azure Bot and SS plugins to the UniMRCP server are licensed software.
 Licensing Model Check out the licensing terms
In order to obtain a trial license, node information must be retrieved and submitted for license generation.
Use the installed tool unilicnodegen to retrieve the node information.
sudo /opt/unimrcp/bin/unilicnodegen
As a result, a text file uninode.info will be saved in the current directory.
Consider the following procedure to place an order.
- Navigate to https://unispeech.io/azbot.
- Under the section Obtain License, select
- License Variation: Trial
- License Term: 30-day
- License Type: Node-bound
- License Quantity: 2
- Click Add to cart.
- Navigate to https://unispeech.io/azss.
- Under the section Obtain License, select
- License Variation: Trial
- License Term: 30-day
- License Type: Node-bound
- License Quantity: 2
- Click Add to cart.
- Click View cart.
- Click Proceed to checkout and then Place order.
- Attach the retrieved uninode.info file to the placed order.
The orders are normally processed within one business day.
¶ 4.3 Deploying Licenses
The provided license files need to be placed into the directory /opt/unimrcp/data.
 sudo cp umsazurebot_*.lic /opt/unimrcp/data
 sudo cp umsazuress_*.lic /opt/unimrcp/data
¶ 4.4 Deploying Azure Service Credentials
- Azure Bot Plugin
Create a text file azbot.subscription.key in the directory /opt/unimrcp/data.
sudo nano /opt/unimrcp/data/azbot.subscription.key
Place the collected key and the region in the following JSON format. Leave the service-endpoint and api fields empty by default.
{
"subscription-key": "*******************************",
"region": "westus2",
"service-endpoint": "",
"api": ""
}
- Azure SS Plugin
Create a text file cognitive.subscription.key in the directory /opt/unimrcp/data.
sudo nano /opt/unimrcp/data/cognitive.subscription.key
Place the collected key and the authentication endpoint in the following JSON format. Leave the service-endpoint field empty by default.
{
"auth-endpoint": "*******************************",
"auth-key": "*******************************",
"service-endpoint": ""
}
¶ 4.5 Configuring UniMRCP Server
- Server Configuration
Open the configuration file unimrcpserver.xml, located in the directory /opt/unimrcp/conf.
sudo nano /opt/unimrcp/conf/unimrcpserver.xml
Leave enabled only the required MRCP resources such as speechsynth and speechrecog and disable the remaining resources such as recorder and speakverify. This step is optional.
    <resource-factory>
      <resource id="speechsynth" enable="true"/>
      <resource id="speechrecog" enable="true"/>
      <resource id="recorder" enable="false"/>
      <resource id="speakverify" enable="false"/>
    </resource-factory>
In order to load the Azure Bot and SS plugins into the UniMRCP server, add the following entries under the XML element <plugin-factory>. Take out or disable the entries for other plugins.
<!-- Factory of plugins (MRCP engines) -->
<plugin-factory>
 <engine id="Demo-Recog-1" name="demorecog" enable="false"/>
 <engine id="Demo-Synth-1" name="demosynth" enable="false"/>
 <engine id="Azure-Bot-1" name="umsazurebot" enable="true"/>
 <engine id="Azure-SS-1" name="umsazuress" enable="true"/>
</plugin-factory>
- Logger Configuration
Open the configuration file logger.xml, located in the directory /opt/unimrcp/conf.
sudo nano /opt/unimrcp/conf/logger.xml
In order to enable log statements produced by the plugins, add the following entries under the element <sources>.
<source name="AZUREBOT-PLUGIN" priority="INFO" masking="NONE"/>
<source name="AZURESS-PLUGIN" priority="INFO" masking="NONE"/>
- Plugin Configuration
The configuration files of the plugins umsazurebot.xml and umsazuress.xml are located in the directory /opt/unimrcp/conf.
While the default settings are sufficient for use in the scope of this tutorial, refer to the Usage Guide of the plugins for more information.
 Usage Guide Azure Bot
¶ 4.6 Launching UniMRCP Server
Start the UniMRCP server as a service.
sudo systemctl restart unimrcp
Open the current log file of the server, located in the directory /opt/unimrcp/log.
cat /opt/unimrcp/log/unimrcpserver_current.log
Check whether the plugins are loaded normally.
[INFO] Load Plugin [Azure-Bot-1] [/opt/unimrcp/plugin/umsazurebot.so]
[INFO] Load Plugin [Azure-SS-1] [/opt/unimrcp/plugin/umsazuress.so]
Next, check for the license information.
[NOTICE] UniMRCP AZUREBOT License
-product name: umsazurebot
-product version: 1.0.0
-license owner: -
-license type: trial
-issue date: 2021-05-19
-exp date: 2021-05-19
-channel count: 2
-feature set: 0
[NOTICE] UniMRCP AZURESS License
-product name: umsazuress
-product version: 1.0.0
-license owner: -
-license type: trial
-issue date: 2021-05-19
-exp date: 2021-05-19
-channel count: 2
-feature set: 0
¶ 4.7 Validating Installation
The optional package umc-addons must be installed for this test to work.
Launch the sample UniMRCP client application umc.
cd /opt/unimrcp/bin
sudo ./umc
Run a typical speech recognition scenario by issuing the command run tsr1 from the console of the umc client application.
run tsr1
Run a typical speech synthesis scenario by issuing the command run bss1 from the console of the umc client application.
run bss1
Visually inspect the logs for any possible warnings or errors.
¶ 5 Asterisk
This section provides instructions for installation and configuration of the Asterisk and a sample Python application.
¶ 5.1 Installing Asterisk
In order to install the Asterisk packages, use the following command.
sudo apt-get install asterisk
In order to install the app-unimrcp module for Asterisk, use the following command.
sudo apt-get install asterisk-app-unimrcp
In order to install the Python module for Asterisk, required for execution of sample AGI speech applications, use the following commands.
sudo apt-get install python-asterisk pip
sudo pip install pyst2
¶ 5.2 Configuring Asterisk
- MRCP Configuration
Open the configuration file of the app-unimrcp module mrcp.conf, located in the directory /etc/asterisk.
sudo nano /etc/asterisk/mrcp.conf
For the default profile ums2, set the private IP address of the instance. Since both the Asterisk and the UniMRCP server are installed on the same instance, the parameters server-ip, client-ip and rtp-ip must be set to the same IP address.
;
; General settings
;
[general]
; Default ASR and TTS profiles.
default-asr-profile = ums2
default-tts-profile = ums2
; UniMRCP logging level to appear in Asterisk logs.  Options are:
; EMERGENCY|ALERT|CRITICAL|ERROR|WARNING|NOTICE|INFO|DEBUG -->
log-level = DEBUG
max-connection-count = 100
max-shared-count = 100
offer-new-connection = 1
; rx-buffer-size = 1024
; tx-buffer-size = 1024
; request-timeout = 5000
; speech-channel-timeout = 30000
;
; Profile for UniMRCP Server [MRCPv2]
;
[ums2]
; MRCP settings
version = 2
;
; SIP settings
server-ip = 10.1.0.4
server-port = 8060
; SIP user agent
client-ip = 10.1.0.4
client-port = 25097
sip-transport = udp
;
; RTP factory
rtp-ip = 10.1.0.4
rtp-port-min = 28000
rtp-port-max = 29000
;
; Jitter buffer settings
playout-delay = 50
max-playout-delay = 200
; RTP settings
ptime = 20
codecs = PCMU PCMA L16/96/8000 telephone-event/101/8000
; RTCP settings
rtcp = 0
Replace 10.1.0.4 with the private IP address of your instance collected in Section 3.1.
- Azure Bot AGI Application
Deploy the following sample Azure Bot AGI application agi_azurebot.py in to the directory /usr/share/asterisk/agi-bin.
sudo nano /usr/share/asterisk/agi-bin/agi_azurebot.py
#!/usr/bin/python3
"""
    Asterisk AGI Azure Echo Bot Demo Application
    This script interacts with Azure echo bot via UniMRCP server.

    * Revision: 1
    * Date: May 5, 2021
    * Vendor: Universal Speech Solutions LLC
"""

import sys
from asterisk.agi import *

class AzurebotApp:

    """A class representing Azure bot application"""

    def __init__(self, options):
        """Constructor"""
        self.options = options
        self.status = None
        self.cause = None
        self.prompt = 'Welcome to Azure Echo bot. Say something, and I will repeat your phrase back.'

    def detect_intent(self):
        """Performs a streaming intent detection"""
        self.grammar = "builtin:speech/transcribe"
        self.synth_and_recog()

    def synth_and_recog(self):
        """This is an internal function which calls SynthAndRecog"""
        if not self.prompt:
            self.prompt = ' '
        args = "\\\"%s\\\",\\\"%s\\\",%s" % (
            self.prompt, self.grammar, self.options)
        agi.set_variable('RECOG_STATUS', '')
        agi.set_variable('RECOG_COMPLETION_CAUSE', '')
        self.action = None
        agi.appexec('SynthandRecog', args)
        self.status = agi.get_variable('RECOG_STATUS')
        agi.verbose('got status %s' % self.status)
        if self.status == 'OK':
            self.cause = agi.get_variable('RECOG_COMPLETION_CAUSE')
            agi.verbose('got completion cause %s' % self.cause)
        else:
            agi.verbose('Recognition completed abnormally')

    def get_speak(self):
        """Retrieves message text from the data returned by bot"""
        speak = agi.get_variable(
            'RECOG_INSTANCE(0/0/speak)')

        """Uncomment this line if your python version is 2.7"""
        # if isinstance(speak, str):
        #     speak = unicode(speak, 'utf-8')
        agi.verbose('got message %s' % speak)
        return speak

    def run(self):
        processing = True
        while processing:
            self.detect_intent()
            processing = True
            if self.status == 'OK':
                if self.cause == '000':
                    self.prompt = self.get_speak()

                elif self.cause != '001' and self.cause != '002':
                    processing = False
            elif self.cause != '001' and self.cause != '002':
                processing = False

        if not self.prompt:
            self.prompt = 'Thank you. See you next time.'
        agi.appexec('MRCPSynth', "\\\"%s\\\"" % self.prompt)

agi = AGI()
options = 'nif=json&plt=1&b=1&sct=1000&sint=15000&nit=10000'
botApp = AzurebotApp(options)

botApp.run()
agi.verbose('exiting')
Change the ownership of the agi-bin directory to asterisk and make the script executable.
sudo chown -R asterisk:asterisk /usr/share/asterisk/agi-bin
sudo chmod +x /usr/share/asterisk/agi-bin/agi_azurebot.py
Since the application expects the results to be in the JSON format, the configuration parameter tag-format should be set to semantics/json in the configuration file umsazurebot.xml located in the directory /opt/unimrcp/conf
sudo nano /opt/unimrcp/conf/umsazurebot.xml
   <results
      format="standard"
      indent="0"
      replace-dots="true"
      replace-dashes="true"
      confidence-format="auto"
      tag-format="semantics/json"
   />
Restart the UniMRCP server for the change to take effect.
sudo systemctl restart unimrcp
- Dialplan
Open the configuration file extensions.conf, located in the directory /etc/asterisk.
sudo nano /etc/asterisk/extensions.conf
Add an extension 702 under the demo context.
exten => 702,1,Answer()
exten => 702,2,agi(agi_azurebot.py)
- SIP Settings
Open the configuration file sip.conf, located in the directory /etc/asterisk.
sudo nano /etc/asterisk/sip.conf
Since Asterisk is located in a private network, the NAT settings must be configured accordingly in the general section.
localnet=10.1.0.4/255.255.255.0
externaddr=20.98.66.204
nat=yes
Replace 10.1.0.4 with the private IP address and 20.98.66.204 with the public IP address of your instance collected in Section 3.1.
Add a SIP profile by giving the profile a name and setting a password which would need to be used while registering a SIP phone to Asterisk.
[astums]
type=friend
context=default
secret=******
host=dynamic
disallow=all
allow=ulaw
- RTP Ports
Open the configuration file rtp.conf, located in the directory /etc/asterisk.
sudo nano /etc/asterisk/rtp.conf
Narrow the default RTP port range to match the inbound rule specified in Section 3.1. Set the intended rtpstart and rtpend port numbers.
;
; RTP Configuration
;
[general]
;
; RTP start and RTP end configure start and end addresses
;
; Defaults are rtpstart=5000 and rtpend=31000
;
rtpstart=10000
rtpend=10010
¶ 5.3 Launching Asterisk
Start the Asterisk as a service.
sudo systemctl restart asterisk
¶ 5.4 Placing SIP Calls
Register a SIP phone to the configured profile astums on Asterisk and dial the extension 702 associated to the bot application.
¶ 6 References
This section provides additional references to the tutorial.